Endurance flight, to see how long, how high and how accurate can the plane be flown. And to get some practice and have some fun.
About 15 minutes of flying with all the gear on board, total distance traveled just over 13 kilometers and 220 meters of altitude difference:
On the graph you can clearly see the approach and low flyover the runway, then rapid acceleration while gaining some altitude to circle around and try again.
This one got off to a rocky start. With all the modifications to the tail, just levelling the control surfaces was not quite enough to get the plane to fly straight. Look out for unintentional barrel rolls in the video :D
Launching the plane for the first time, it tented to pitch the nose down, taking almost half nose up input to fly it straight. This resulted in a "roller coaster" flight, where some altitude was gained, then controls centred and trimmed little by little. Business as usual.
After landing and physically adjusting the trim settings the second flight was a lot smoother.
Combined flight took around 10 minutes with 10.63km travelled at around 50km/h:
The plan was simple. Utilize the battery (3 minutes full throttle or 9 minutes half throttle) to the fullest.
Start with 1 minute of full throttle to get some altitude, 66% or 6 minutes half throttle left. Flay a couple of overpasses for 4 minutes, 2 minutes left at half throttle. Land with remaining battery.
Sadly the plan didn't go quite as planned:
First take off attempt was aborted because one of the wheels snagged on the grass and turned off the runway (here were 10 seconds of full throttle lost). Then the plane didn't get as high as intended, so flying by the visible size, the plane was flown farther then intended (here it took longer to fly back). Add some wind higher up, so when trying to hold the plane as still as possible for the photos produced larger turns.
Long story short, 5 minutes and 33 seconds later the plane landed 3 meters from the runway because it ran out of power to run the motor 20 centimetres off the ground approaching the runway. But the new landing gear held. No pivot over this time, just some torn duct tape.
Much was learned today and if the pictures turn out useful, it was worth it.
We need pictures! And for that the plane needs an upgrade.
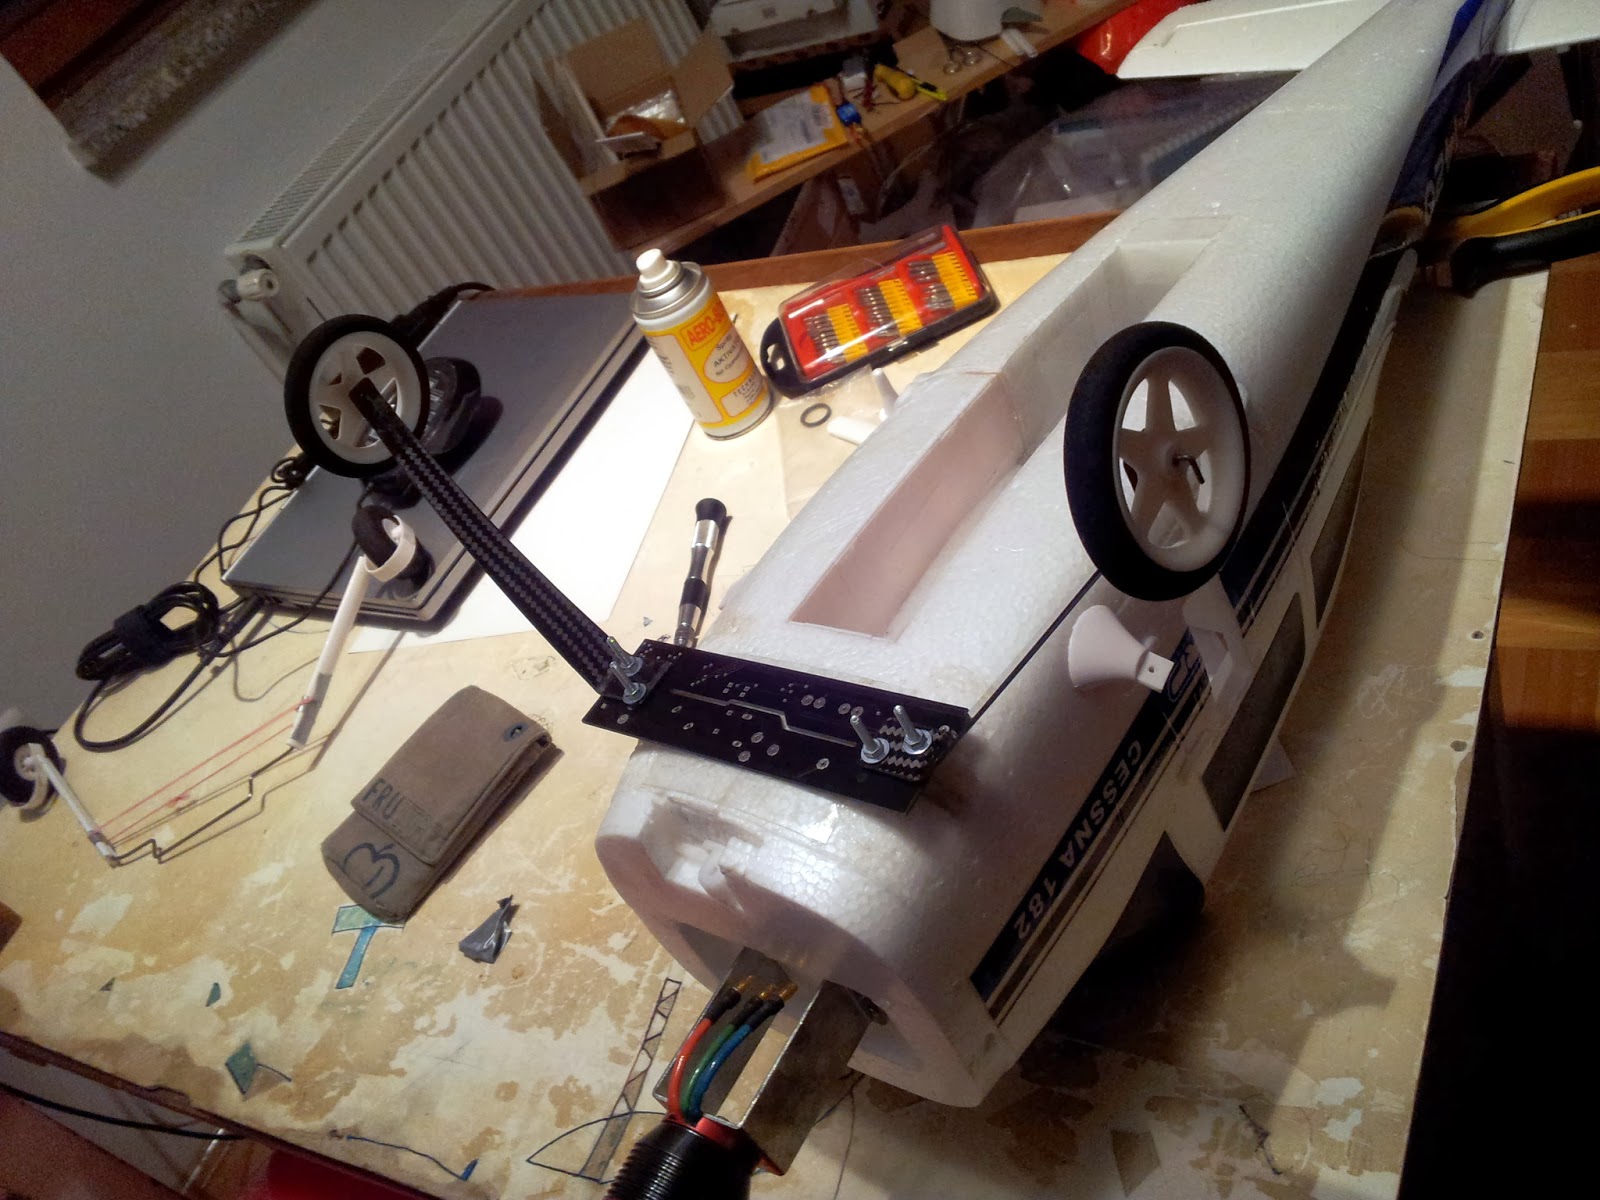
First of, a better landing gear:
Made from a spare PCB board from another project as a base (strong and flexible). To which a set of foam and plastic wheels on flat carbon bracket were mounted.
Attached with duct tape, the landing gear work perfectly. The PCB base bends under load and if there is any excessive force applied it goes to the duct tape which breaks and tears but is easy replaceable.
Only the bent rod holding the wheels to the carbon bracket kept braking from the glue. Quick fix, reinforced with zip-ties instead of just glue for extra strength.
Now the plane is finally ready for the extra weight of the camera mount, without the need to fix the landing gear after every heavy landing.
And second, to take pictures we need to synchronise the cameras! Yes, the board to let the phone control the servos and the cameras (to synchronize GPS data with shots taken) is in the works, but for a quick test lets use what we have:
Just change the firmware from our rc2usb board to output a second long pulse every 5 seconds instead of the PWM for the servo tester.
Now cut up and strip down a couple of cheep mini USB cables to get the connectors, wire up the power lines to the pulse output on the board and run the wires trough the camera stand.
We are now ready to take some high resolution pictures!
With only the control circuit between the autopilot program on the phone and the plane for autonomous flights missing, the weight of the plane is now just below 1.9 Kg. Not bad for all the equipment.
But is it better? Yes!
First, the vibrations are almost gone:
Left picture, previous flight, fully loaded with the stock motor at full throttle.
Right picture, this flight, fully loaded with the new motor at full throttle.
The difference is enormous:
And that's not al. With the new engine, the plane now climbs effortlessly:
In this test, with no one around on the ground or in the air, altitude difference of around 300 m was achieved.
And with no problems with telemetry this time, we learned that the cruising speed at which the altitude can be maintained is around 45 Km/h, which takes about half throttle.
Unfortunately, but not unexpectedly due to all the extra equipment, the gliding profile is somewhat disappointing. With the engine off, the plane glides, but the vertical speed necessary to maintain the cruising speed is around -35 Km/h, peeking at -50 Km/h. In short, it flies but it eats up altitude like crazy as can be seen on the video above at 3:00 mark (yes, the propeller keeps spinning due to resistance).
But, smoother and more powerful motor means better images and video from the cameras, and that's what we want!
The plane flies, fully loaded even. But! It couldn't climb very high and all the camera recordings were suffering from vibrations coming from the motor.
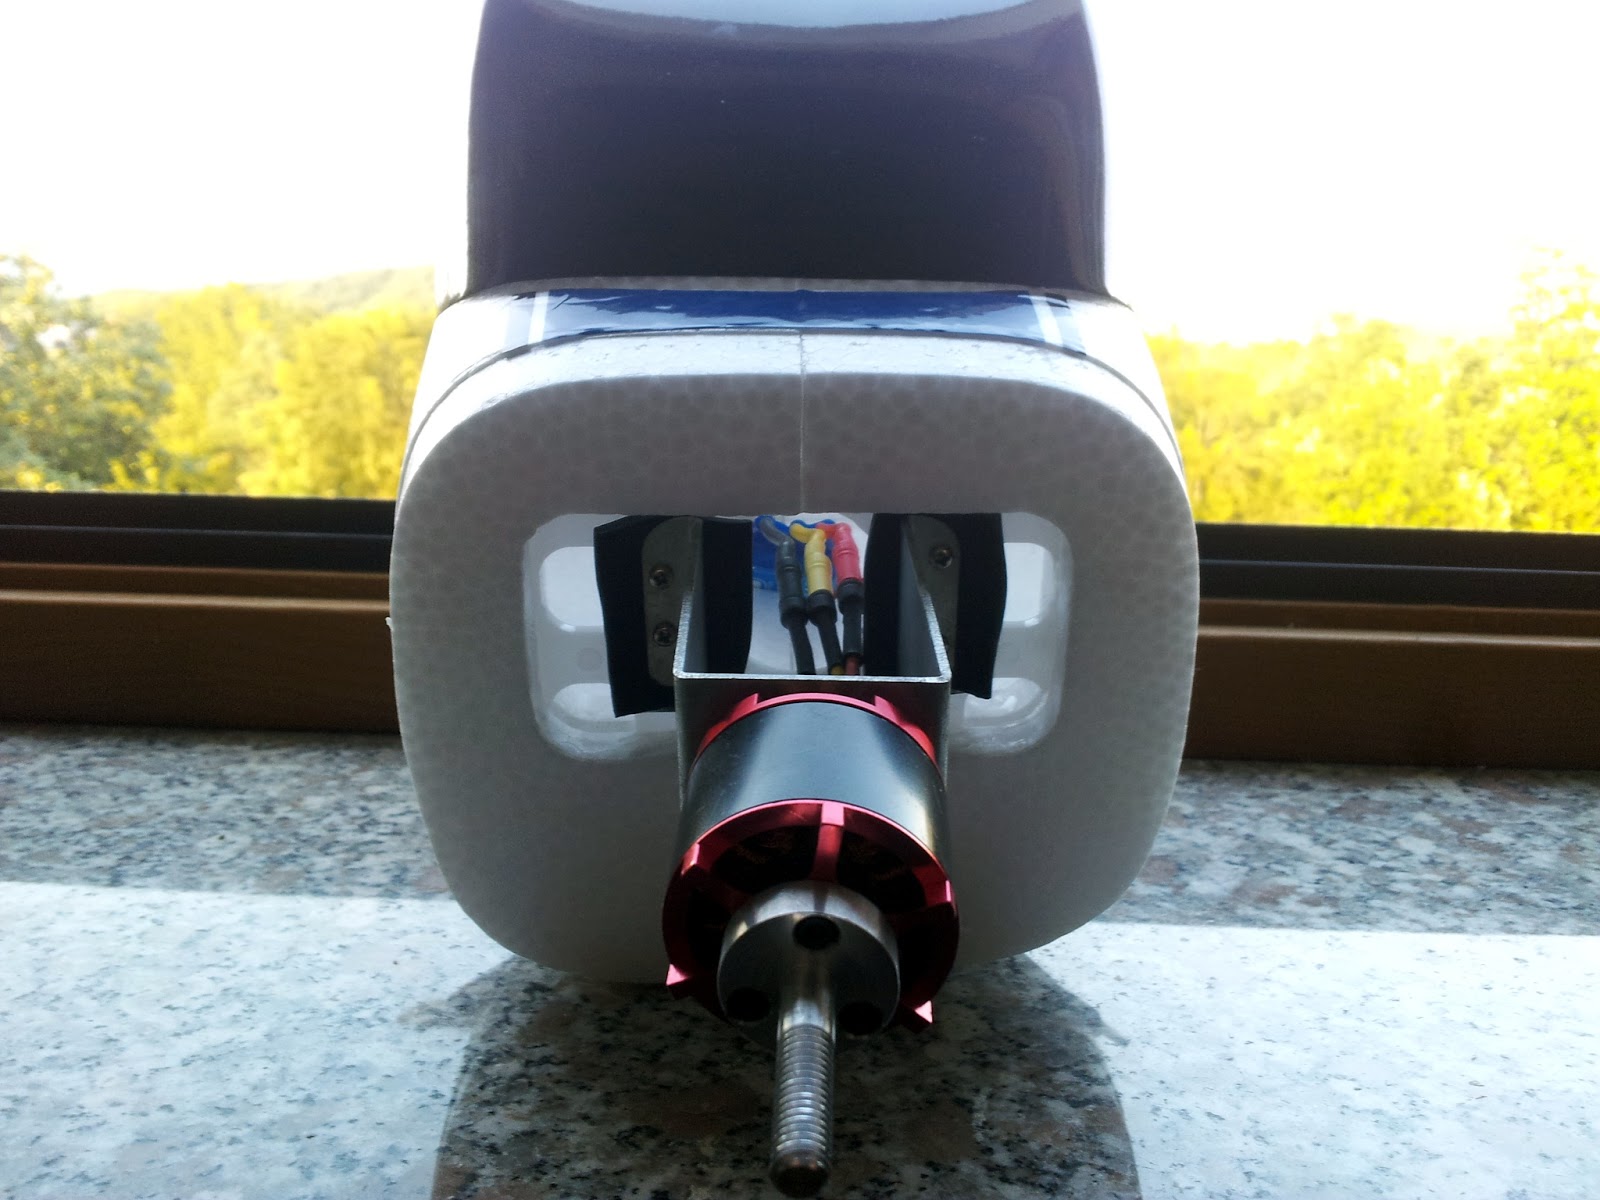
So, the solution is simple, replace the motor. Implementation, not so much but not on the account of having to turn screws.
Unfortunately the desired one, O.S. 3820-1200 didn't come trough in time, so we got the second best thing, KONTRONIK KORA 15-10.
Cue the montage sequence:
Just add a few more holes since the spacing on this motor a slightly bigger and drill the hole in the center of the prop from 5mm to 10mm because someone goofed up and got the wrong prop mount. But it all balanced out perfectly in the end.
New motor and better regulator. Some day maybe a bigger battery and then a larger plane with newer motor, and so on, but for now this is it.
Few quick tests with a piece of string and a scale, determined the motor with 11x5.5 prop gives out 1.6 Kg of thrust at full throttle. With more aggressive timing setting on the regulator it gave out 1.7 Kg of thrust, but the output was not linear with the throttle.
For comparison, the old motor gave 0.98 Kg of thrust at full throttle.
And another test on the battery capacity gave us: 3 minutes at full throttle and 9 minutes at at half throttle on the new motor. Compared to the 6 minutes at full throttle and 11 minutes at half throttle on the old one.
Time to test in in the air to see if the trouble was worth it.
And that's not all it did. The camera system works! It successfully takes pictures and video:
Stereo pictures! Might be uncomfortable to look at since the lens distance is not optimized for human viewing, but the depth data is there.
Still taken, synchronized and aligned by hand. There is one more part missing from the plane, and that is the circuit that will relay the data from the autopilot running on the phone to the servos. And part of that will also be automatic synchronised picture taking. As for the alignment, that will be the fun part once we have some real data.
And yes, there is also stereo video. Slightly easier for humans to watch, since distance between lenses is offset by the distance to the object in focus.
But unfortunately the video taken is slightly blurry. Fault of the stock engine, which is not of the best quality and is causing much vibrations, which are also noticeable on the panoramic video. Not much can be done here but to replace the engine with something better.
And while we're at it, replace it with something more powerful, since while the plane flew, and it flew quite stable, it had horrible climb rate and required full throttle to maintain altitude.
Now with three cameras on board, there is one more flight video:
The landing could be better :P Not used to the extra weight, the runway was missed by 30cm, touching down on high grass and flipping over. So nothing but pride was broken.
And what would a report be without the visualization of the whole flight:
Unfortunately there was problem with the SD card in the phone, so not all the data was captured hence the lack of attitude visualization and force graphs.
All in all a very successful test flight. What works and what doesn't is known, so the next logical step is to work out the kinks and try again!
We know the plane flies and can even do some simple acrobatics. But the real question is, can it fly with all the equipment?
Only one way to find out, which means it's time for some more modifications!
First we determine the location of the camera mount on/in the fuselage:
Keep in mind where the center of gravity will be once the cameras are on the plane, then cut the carbon tubing holder size box on one side and appropriate placed holes on the other side of the plane.
Center it just right and it looks like this:
Now that we have the camera holder in place it's time to use the camera holder mounts we prepared and printed.
The mounts will hold the holder to the wing so it wont move about and also to redistribute the weight a bit more evenly:
First locate and mark a good spot, close enough that will hold the stand and leave enough room so the cameras could be put on, but still far enough so the stand can be slide in and out.
Then mark the spot, carve it out (watch out for the servo wires) and protect the servo wires with wax (so once everything is coved with glue and the plane is beyond repair we can remove the servos without it's wires being glued).
Once that is done, drill appropriate holes in to the mounts so the fit around the carbon tube holding the wing, fit them inside the holes and drown them in glue.
After some time when the glue is set, we have out wings with mounts that look like this:
To fully assemble and disassemble the plane now is a whole process, but it's worth it when the end result looks like this:
Some more flying experience, this time in the wind.
And just so, it won't always be the same, this time the panorama render was shifter for 90° (left side is the view to the front and right side is the view to the back):
And visualization of course:
And what would be a training session without bloopers? Not so educational. :P
Turns out, that you can do loops and rolls with this plane on purpose too, but you better have everything mounted on with enough strength to withstand the extra forces!
Or on your next flight, right after levelling from a loop, the battery decide to fly away in a different direction. But luckily, with no control, the plane managed to find the only bush near and far and landed "softly":
Couple drops of glue is a bargain for telemetry data:
More experiences brings more knowledge, and more knowledge brings more improvements.
Second service pack for the plane!
First to fix the nose heavy problem, the battery bay was extended towards the tail:
First, cut out and extend the battery bay. But look, now we can see inside the plane. Well, that's bad. No where to stick the battery to.
So we make a plastic holder from cut out plastic strips from various plastic packages.
And after some glueing and trimming we have an extended battery bay, which allows for better weight distribution by placing battery farther back from the center of gravity.
And while we were at it, let's put some silicon pads between the engine and the mount, just to see if it will reduce some vibrations.
But not before firmly glueing the plastic engine mount to the fuselage. It might have been damaged by a previous rough landing or it wasn't glued on well from the start, but it swivel up and down a bit when some force was applied to it.
As the title describes, second time in the sky, trying out the new modifications.
Getting ready in the sun:
And let's jump right in to the fist flight of the day:
Pretty pictures, right? Only getting better! By the way, did anyone catch the barrel roll near the end?
The plane was quite nose heavy, which made it difficult to keep it the air, so right after take off it was decided to land at the end of first circle. Would you know, right at the end there was some more wind and for a second I didn't know if it was flying up or down, away or not. Yes, that's when the barrel roll happened.
Luckily the plane landed and after some weight redistribution and some elevator trimming was ready to try again:
Still a bit nose heavy, but much more manageable this time around.
Three laps for fun and science. And for fun, attention should be given to the last lap before landing. It takes "ages" to fly far away enough, but only seconds to fly back, causing quite a speedy landing. The answerer to this mystery is wind (flying against the wind = slow, flying with the wind = fast).
And to top it off, another pivot at the end. Turns out the landing gear takes a bit more force then expected. The first landing bent the gear in to the foam of the plane where the home made plastic mount ended and the second landing flipped over on loose gear.
Still some kinks to work out, so back to work then.
First some telemetry mystery. Actually, no mystery. Part of the code for getting data from the sensors was reused from the previous iteration. Well, previous iteration ran on Android 1.6 and 2.0, and some of the stuff, like the virtual orientation sensor is now deprecated. Onwards with rotation matrices.
For one, the old sensor doesn’t translate coordinate system rotations well:
Old and new - yaw in time.
Old and new - pitch in time.
Old and new - roll in time.
It's still not perfect. The interference from the engine still distorts telemetry somewhat (clearly visible spikes when the engine turns on and off). But for the first go, this will do. The science of hand written filters and sensor fusion will have to wait another day.
But that's not all. Upon closer inspection, it was discovered, that he motor shaft (or the motor itself) is not the straightest thing in the world. To reduce the wabble a piece of paper was placed under one side of the shaft:
Not completely removing all the vibrations, but it helped somewhat.
And now for the issue of the plane flipping over on take offs and landings. Simple, switch the gear so that the two wheels are in front and the one wheel is on the back:
And as a quick bonus, use some spare parts lying around to transferee it's function as a steering wheel:
All it takes is a few thin carbon rods and joints from a retired model, and a "slightly" more powerful servo with steel cogs to move the wheel and the rudder, which won't brake if it gets tangled in grass again.